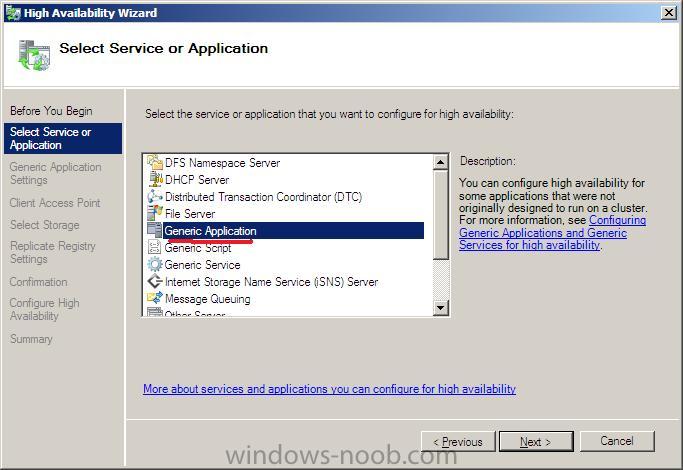
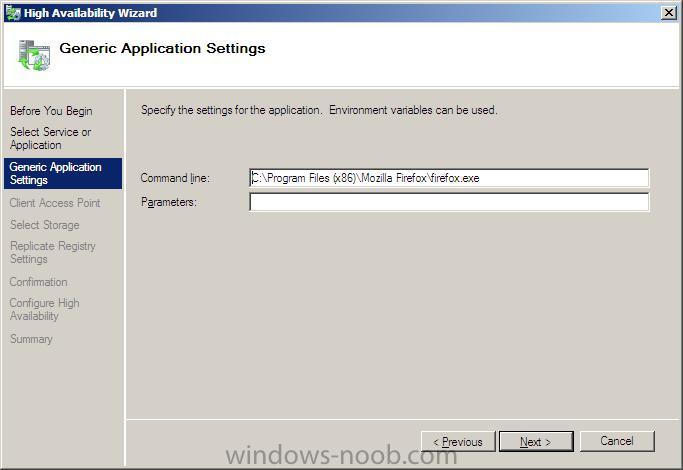
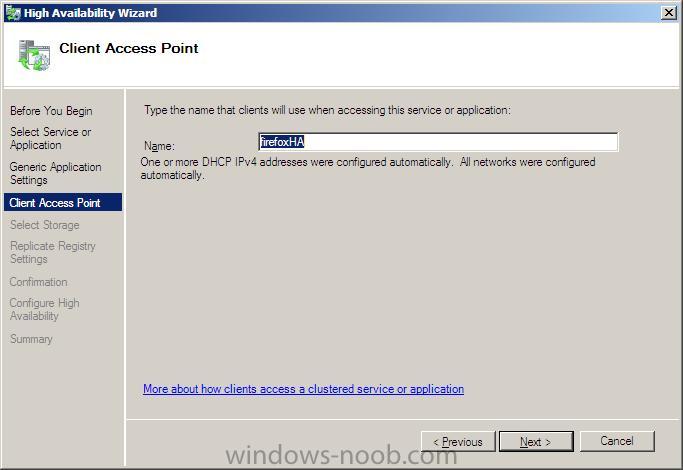
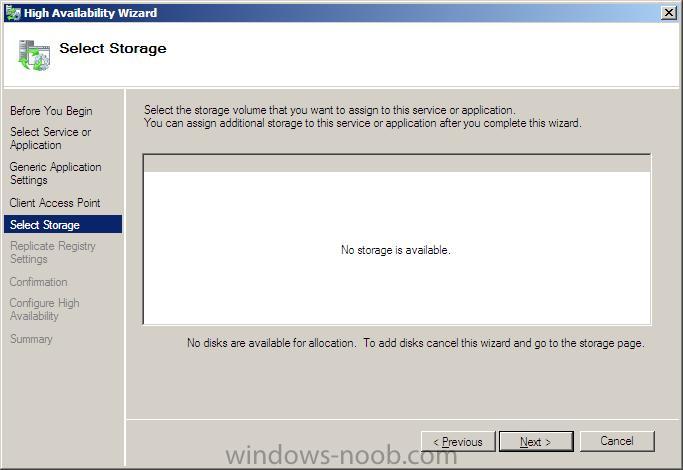
Wednesday 21 March 2012

Quick tips on troubleshooting FSMO roles


Here are some tips on troubleshooting FSMO roles, presented in the form of a pop-quiz. See how you score on it, answers are at the bottom.
1. I can't add a new domain to my forest. Which FSMO role might be down?
2. I tried running adprep /domain but it failed. Which FSMO role might be down?
3. Some users changed their password but now they can't log on. Which FSMO role might be down?
4. The clocks on my servers don't seem to be synchronized properly. Which FSMO role might be down?
5. I tried upgrading a Windows 2000 domain controller to Windows Server 2003 but the DNS application partition wasn't created. Which FSMO role might be down?


ANSWERS:
1. Domain Naming Master  2. Infrastructure Master  3. PDC Emulator  4. PDC Emulator  5. Domain Naming Master

Managing Active Directory FSMO Roles


There are five different FSMO roles and they each play a different function in making Active Directory work:
  • PDC Emulator - This role is the most heavily used of all FSMO roles and has the widest range of functions. The domain controller that holds the PDC Emulator role is crucial in a mixed environment where Windows NT 4.0 BDCs are still present. This is because the PDC Emulator role emulates the functions of a Windows NT 4.0 PDC. But even if you've migrated all your Windows NT 4.0 domain controllers to Windows 2000 or Windows Server 2003, the domain controller that holds the PDC Emulator role still has a lot to do. For example, the PDC Emulator is the root time server for synchronizing the clocks of all Windows computers in your forest. It's critically important that computer clocks are synchronized across your forest because if they're out by too much then Kerberos authentication can fail and users won't be able to log on to the network. Another function of the PDC Emulator is that it is the domain controller to which all changes to Group Policy are initially made. For example, if you create a new Group Policy Object (GPO) then this is first created in the directory database and within the SYSVOL share on the PDC Emulator, and from there the GPO is replicated to all other domain controllers in the domain. Finally, all password changes and account lockout issues are handled by the PDC Emulator to ensure that password changes are replicated properly and account lockout policy is effective. So even though the PDC Emulator emulates an NT PDC (which is why this role is called PDC Emulator), it also does a whole lot of other stuff. In fact, the PDC Emulator role is the most heavily utilized FSMO role so you should make sure that the domain controller that holds this role has sufficiently beefy hardware to handle the load. Similarly, if the PDC Emulator role fails then it can potentially cause the most problems, so the hardware it runs on should be fault tolerant and reliable. Finally, every domain has its own PDC Emulator role, so if you have N domains in your forest then you will have N domain controllers with the PDC Emulator role as well.
  • RID Master - This is another domain-specific FSMO role, that is, every domain in your forest has exactly one domain controller holding the RID Master role. The purpose of this role is to replenish the pool of unused relative IDs (RIDs) for the domain and prevent this pool from becoming exhausted. RIDs are used up whenever you create a new security principle (user or computer account) because the SID for the new security principle is constructed by combining the domain SID with a unique RID taken from the pool. So if you run out of RIDS, you won't be able to create any new user or computer accounts, and to prevent this from happening the RID Master monitors the RID pool and generates new RIDs to replenish it when it falls beneath a certain level.
  • Infrastructure Master - This is another domain-specific role and its purpose is to ensure that cross-domain object references are correctly handled. For example, if you add a user from one domain to a security group from a different domain, the Infrastructure Master makes sure this is done properly. As you can guess however, if your Active Directory deployment has only a single domain, then the Infrastructure Master role does no work at all, and even in a multi-domain environment it is rarely used except when complex user administration tasks are performed, so the machine holding this role doesn't need to have much horsepower at all.
  • Schema Master - While the first three FSMO roles described above are domain-specific, the Schema Master role and the one following are forest-specific and are found only in the forest root domain (the first domain you create when you create a new forest). This means there is one and only one Schema Master in a forest, and the purpose of this role is to replicate schema changes to all other domain controllers in the forest. Since the schema of Active Directory is rarely changed however, the Schema Master role will rarely do any work. Typical scenarios where this role is used would be when you deploy Exchange Server onto your network, or when you upgrade domain controllers from Windows 2000 to Windows Server 2003, as these situations both involve making changes to the Active Directory schema.
  • Domain Naming Master - The other forest-specific FSMO role is the Domain Naming Master, and this role resides too in the forest root domain. The Domain Naming Master role processes all changes to the namespace, for example adding the child domain vancouver.mycompany.com to the forest root domain mycompany.com requires that this role be available, so you can't add a new child domain or new domain tree, check to make sure this role is running properly.
To summarize then, the Schema Master and Domain Naming Master roles are found only in the forest root domain, while the remaining roles are found in each domain of your forest. Now let's look at best practices for assigning these roles to different domain controllers in your forest or domain.

Proper placement of FSMO Roles boils down to three simple rules:
  • Rule One: In your forest root domain, keep your Schema Master and Domain Naming Master on the same domain controller to simplify administration of these roles, and make sure this domain controller contains a copy of the Global Catalog. This is not a hard-and-fast rule as you can move these roles to different domain controllers if you prefer, but there's no real gain in doing so and it only complicates FSMO role management to do so. If for reasons of security policy however your company decides that the Schema Master role must be fully segregated from all other roles, then go ahead and move the Domain Naming Master to a different domain controller that hosts the Global Catalog. Note though that if you've raised your forest functional level to Windows Server 2003, your Domain Naming Master role can be on a domain controller that doesn't have the Global Catalog, but in this case be sure at least to make sure this domain controller is a direct replication partner with the Schema Master machine.
  • Rule Two: In each domain, place the PDC Emulator and RID Master roles on the same domain controller and make sure the hardware for this machine can handle the load of these roles and any other duties it has to perform. This domain controller doesn't have to have the Global Catalog on it, and in general it's best to move these two roles to a machine that doesn't host the Global Catalog because this will help balance the load (the Global Catalog is usually heavily used).
  • Rule Three: In each domain, make sure that the Infrastructure Master role is not held by a domain controller that also hosts the Global Catalog, but do make sure that the Infrastructure Master is a direct replication partner of a domain controller hosting the Global Catalog that resides in the same site as the Infrastructure Master. Note however that this rule does have some exceptions, namely that the Infrastructure Master role can be held by a domain controller hosting the Global Catalog in two circumstances: when there is only one domain in your forest or when every single domain controller in the domain also hosts the Global Catalog.
To summarize these three rules then and make them easy to remember:
  • Forest root domain - Schema Master and Domain Naming Master on the same machine, which should also host the Global Catalog.
  • Every domain - PDC Emulator and RID Master on the same machine, which should have beefy hardware to handle the load.
  • Every domain - Never place the Infrastructure Master on a machine that hosts the Global Catalog, unless your forest has only one domain or unless every domain controller in your forest hosts the Global Catalog. 


Distributed File System (DFS) for Windows Server 2003


Introduction

The Distributed File System is used to build a hierarchical view of multiple file servers and shares on the network. Instead of having to think of a specific machine name for each set of files, the user will only have to remember one name; which will be the 'key' to a list of shares found on multiple servers on the network. Think of it as the home of all file shares with links that point to one or more servers that actually host those shares. DFS has the capability of routing a client to the closest available file server by using Active Directory site metrics. It can also be installed on a cluster for even better performance and reliability. Medium to large sized organizations are most likely to benefit from the use of DFS - for smaller companies it is simply not worth setting up since an ordinary file server would be just fine.

Understanding the DFS Terminology
It is important to understand the new concepts that are part of DFS. Below is an definition of each of them.
Dfs root: You can think of this as a share that is visible on the network, and in this share you can have additional files and folders.
Dfs link: A link is another share somewhere on the network that goes under the root. When a user opens this link they will be redirected to a shared folder.
Dfs target (or replica): This can be referred to as either a root or a link. If you have two identical shares, normally stored on different servers, you can group them together as Dfs Targets under the same link.

The image below shows the actual folder structure of what the user sees when using DFS and load balancing.

Figure 1: The actual folder structure of DFS and load balancing
Windows 2003 offers a revamped version of the Distributed File System found in Windows 2000, which has been improved to better performance and add additional fault tolerance, load balancing and reduced use of network bandwidth. It also comes with a powerful set of command-line scripting tools which can be used to make administrative backup and restoration tasks of the DFS namespaces easier. The client windows operating system consists of a DFS client which provides additional features as well as caching.

Setting Up and Configuring DFS

The Distributed File System console is installed by default with Windows 2003 and can be found in the administrative tools folder. To open, press Start > Programs > Administrative Tools > Distributed File System or in the Control Panel, open the Administrative Tools folder and click on the Distributed File System icon. This will open the management console where all the configuration takes place.

The first thing you need to do is create a root. To do this, right click the node and select New Root.
Press next on the first window to be brought to the screen where you will have to make the choice of creating either a stand alone or domain root. A domain root will publish itself in Active Directory and supports replication, whereas a stand alone root does not. If you have an AD Domain Controller set up on your machine, I recommend choosing the domain root.

Note: The root would be the top level of the hierarchy. It is the main Active Directory container that holds Dfs links to shared folders in a domain. Windows 2003 allows your server to have more than one root - which wasn't the case in Windows 2000.
The next screen is the one where you have to select which trusted domains will be hosted. Since I only have one domain in my network, only domain.com is visible.

Once this is done you have to select a server on that domain - in my example it is netserv. The FQDN (Fully Qualified Domain Name) of this host server is netserv.domain.com.

Figure 2: inputting the host server name
The following screen allows you to specify the root name of your primary DFS root. You should give it something which will accurately define the contents of that share.
In my example I have called this root "Company" - which would be a real name of an ogranization. You can change this to anything you want. You might wish to have a root called "Documents" - which would clearly state that one can expect to find anything related or specific to documents, and documentation in that root. 

Figure 3: entering the dfs root name
You will now have to select the location of a folder in which all the files will be stored.

Figure 4: selecting the root share
Tip: for added security, when selecting a folder, try to choose one that is located on a partition other than that of the operating system.

Your DFS root is now configured and visible in the configuration console. Right click the root target and press Status to check if it is online or not.
A green check mark verifies that everything is working properly and that the node is online, whereas a red X means that there is a problem.
To add a new link, right click the root for which you want the link to be created, and select New Link.
In the "New Link" screen, enter a name and path for the link and click OK. Repeat this for as many links as you need to create.

Figure 5: creating a new link
Links are visible right under the node. Below is a screenshot displaying the three links I have created for the COMPANY root.

Figure 6: dfs root and three links in the DFS mmc console
Publishing the root in Active Directory
By publishing dfs roots in AD as volume objects, network users will be able to search for shares more easily and administration can be delegated.
To do this right click the desired dfs root, select Properties and go to the Publish tab. Enter the appropriate details in each box and press OK.
In the keywords section you can specify certain words that will help locate the dfs root when it is being searched for.

Figure 7:
publish tab in the dfs properties window
The dfs root will now be published in Active Directory.
File Replication Services
There are two types of replication:

* Automatic - which is only available for Domain DFS
* Manual - which is available for stand alone DFS and requires all files to be replicated manually.

The four ways in which replication can be achieved between two or more servers are:

- Ring
- Hub and Spoke
- Mesh
- Custom

The first three refer to network topologies and the last allows you to specify an advanced method of replication, which can be tuned to your needs.
The advantages and disadvantages of replication are as follows:

Advantages - client caching, integration with IIS, easy to administer and setup.
Disadvantages - limited configuration options, there is no method of programmatically initiating a replication session.

Saturday 17 March 2012

How can I setup and configure Failover clustering in Windows Server 2008

If you havn't already installed Failover Cluster Management Features, then do so now, you'll need to install the Failover Clustering Feature and theFailover Clustering tools (from Remote Server Administration tools). 

Once done you can access the Failover Cluster Management gui via Start/Administrative Tools, Failover Cluster Management


Step 1. Validate

You must login with a domain User account if you want the full functionality of the Failover Cluster Management, and if you forget you will be reminded.

Attached Image: monthly_11_2008/post-1-1228047496.jpg

Login with a domain user account and start the Failover Cluster Management gui

In the Management Pane, click on Validate a Configuration

Attached Image: monthly_11_2008/post-1-1228048547.jpg

The validate a configuration Wizard will appear, click on Next.

Attached Image: monthly_11_2008/post-1-1228048532.jpg

when the Select Servers or a cluster window appears, enter the Server name to validate or click browse and browse the network for the server

Attached Image: monthly_11_2008/post-1-1228048566.jpg

Attached Image: monthly_11_2008/post-1-1228048579.jpg

click next when ready

You will now be on the Testing Options window,

Attached Image: monthly_11_2008/post-1-1228049968.jpg

click on Next to let the wizard run all tests, please note that the hardware being tested must be marked as 'Certified for Windows Server 2008'.

Attached Image: monthly_11_2008/post-1-1228048594.jpg

You'll get a confirmation screen showing the options you chose, click next to run the tests...


After a while, you'll get a Failover Cluster Validation report, click View Report to view the results and Finish to continue

Attached Image: monthly_11_2008/post-1-1228048615.jpg

the report itself is rather lengthy so worth looking through (please note I ran this test on some standard desktop/laptop/hyper V hardware so as expected SAN info was nowhere to be seen and the hardware did not meet Microsoft's recommended configuration standards...


Step 2. Create Cluster

In the Failover Cluster Management gui, click on Create a Cluster in the Management pane

Attached Image: monthly_11_2008/post-1-1228049803.jpg

after reading the recommendations, click next and enter the name of a server to include in the cluster in the Select Servers window

Attached Image: monthly_11_2008/post-1-1228049821.jpg

Type the name you want to use when administering the cluster (netbios name limited to 15 characters)

Attached Image: monthly_11_2008/post-1-1228049850.jpg

you'll get a confirmation screen listing your details of the cluster

Attached Image: monthly_11_2008/post-1-1228049863.jpg

and clicking next will create the new cluster

Attached Image: monthly_11_2008/post-1-1228049875.jpg

once it is complete, you'll see a summary

Attached Image: monthly_11_2008/post-1-1228049885.jpg

click finish.

note that in my example, the Failover Cluster Management gui now has some warnings about the Node Majority.

Attached Image: monthly_11_2008/post-1-1228049897.jpg 


Step 3. Manage the Cluster

In the Failover cluster Management gui, click on Action, then Manage a cluster

Attached Image: monthly_11_2008/post-1-1228051004.jpg

In the drop down menu, select a cluster to manage,

Attached Image: monthly_11_2008/post-1-1228051016.jpg

when the Failover cluster management cluster appears, click on Add Node in the right pane,

Attached Image: monthly_11_2008/post-1-1228051029.jpg

when the Add node wizard appears, click next

Attached Image: monthly_11_2008/post-1-1228051043.jpg

When the select server window appears, select the server name you are running this from by clicking on browse, advanced and then find now

Attached Image: monthly_11_2008/post-1-1228051054.jpg

in this example i choose 'no' to run the validation tests, click on next to continue *you should click yes to the tests*

Attached Image: monthly_11_2008/post-1-1228051068.jpg

review the confirmation

Attached Image: monthly_11_2008/post-1-1228051095.jpg

click next...

review the summary

Attached Image: monthly_11_2008/post-1-1228051108.jpg

you can now click on the nodes section of Failover cluster management to review your two nodes in the cluster.

Attached Image: monthly_11_2008/post-1-1228051117.jpg


Step 4. Add High Availability Application or Service

In the Failover cluster Management gui, click on Configure a Service or Application in the right pane

Attached Image: monthly_11_2008/post-1-1228052839.jpg

review the Before you begin details in the High Availability wizard and click next...

Attached Image: monthly_11_2008/post-1-1228052849.jpg

In this example the high availability application we will add is (wait for it) Firefox, of course you can choose whatever app/service you wish but to keep this howto simple, I am choosing Firefox as we know it is already installed on both nodes.

Attached Image: monthly_11_2008/post-1-1228052856.jpg

choose Generic Application from the list in Select Service or Application window.

click next and paste in the path to your Mozilla Firefox application

Attached Image: monthly_11_2008/post-1-1228052860.jpg

eg:
c:\Program Files (x86)\Mozilla Firefox\Firefox.exe


click next and give the client access point a name for this service or application, I chose FirefoxHA for high availability...

Attached Image: monthly_11_2008/post-1-1228052863.jpg

select your storage (san... i don't have one, if you want to donate one to Windows-noob.com i'll make sure your product gets named again and again.... )

Attached Image: monthly_11_2008/post-1-1228052866.jpg

add in your Registry settings for replication...

Attached Image: monthly_11_2008/post-1-1228052870.jpg

review the confirmation

Attached Image: monthly_11_2008/post-1-1228052874.jpg

click next and it will configure high availability

review the summary

Attached Image: monthly_11_2008/post-1-1228052877.jpg

and checkout the application itself in the Cluster Services and Applications node

Attached Image: monthly_11_2008/post-1-1228052880.jpg

(offline at the moment, will fix soon)

in addition to the above, I added another Generic Application for Internet Explorer.... and it worked first time

see screenshot...

Attached Image: monthly_11_2008/post-1-1228053489.jpg

Updating Firmware using HP Smart Update Firmware DVD


HP Smart Update Firmware DVD is a collection of firmware which can be installed on suppprted HPProLiant servers, BladeSystems. The Firmware DVD is an ISO image and is available as a download at HP.com. You can use HP Smart Update Firmware DVD for both Online and Offline deployment offirmware update.HP Smart Update Firmware DVD
In offline mode, the Smart Update Firmware DVD boots from Linux kernel and allows the firmwareupdate installation. Personally, I prefer Offline method of firmware deployment as it is considered as a safer option.
In online mode, you must boot the server to the operating system. Then you can run the Autorun utility (Within OS) to launch HP Smart Update Manager or you can browse the DVD to the \hp\swpackages folder and run the firmware updates.The Onboard Administrator, Virtual ConnectEthernet and Fibre Channel Modules are supported only in online deployments.
CAUTION: Before using HP Smart Update Firmware DVD to update firmware, you need to back up the server. HP Firmware DVD will update all firmware of your Server at one go, and if any failure occurs your mission-critical server should not be affected. Keep this in mind :D
In this post, we will discuss how to update the firmware of an HP server using Smart UpdateFirmware DVD in Offline mode. Find out how to do Offline firmware update using Interactive mode. Interactive mode allows you to select required firmware updates before it gets deployed on your Server.

Updating Firmware using Smart Update Firmware DVD:

1. Boot the server from HP Smart Update Firmware DVD.
2. Once the server boots from Firmware DVD, below said screen will appear.
HP Smart Update Firmware DVD Boot Screen
3. At the Boot menu, select Interactive Mode (Automatic is default).
4. Select Language and Keyboard, then click on Continue button.
HP Firmware DVD language and keyboard5. Now you are at the HP End-User License Agreement window.
HP Firmware DVD End-User License Agreement
6. Click on Agree button.
7. The Smart Update Firmware DVD interface will open now.
Smart Update Firmware DVD main window
8. Click on Firmware Update tab
9. Click on Install Firmware link as shown in below provided screen-shot.
Smart Update Firmware DVD Install Firmware
10. Now the HP Smart Update Manager will start building Inventory of Available updates.
HP Smart Update Firmware DVD Inventory of Available updates
11. Then it will Check for Installed Firmware of your Server.
HP Smart Update Firmware DVD Check for Installed Firmware
12. Once it is done, it will open the Select Bundle Filter window.
HP Smart Update Firmware Select Bundle filter
13. Select your Server series from the list (Example: ML-DL 300/500/700 Series in our case)
CAUTION: If you are installing Firmware on HP 100 series Server, then you need to select “HP Smart Update Firmware – 100 series bundle for Linux” and if you installing on a blade, then you need to select “HP Smart Update Firmware – Blade System Release Set for Linux”.
14. Click on OK button.
15. In the next window, select the firmware update that you wish to install.Smart Update Firmware DVD Firmware selection window
16. Click on Install button.
17. HP Smart Update Manager will install the selected Firmware updates on your Server.
Smart Update Firmware DVD Installing firmware
18. Once installation is completed, Installation Results screen will appear.
Smart Update Firmware DVD Installation Results
19. Click on Reboot Now button to restart the Server.
20. Congratulation, you have successfully updated firmware of your HP Server.

Always use the Firmware DVD released for your Server. If you are using an older HP Server, then the latest HP Firmware DVD will not be supported by your server. Also ensure that you have taken the backup of the server before you update firmware:D