Step 1 – Create a new Cluster
1. To create a new Cluster, right click on your Datacenter object and click New Cluster.

2. On this screen we’ll give our cluster a name and turn on VMware HA and VMware DRS. For more information on HA and DRS please check out the Resources area.


6. Finally, We will be storing the Virtual Machine swapfile with the Virtual Machine. (in the same datastore as the VM). You do have the option to seperate it, however you may suffer a performance hit if you do so. Click Next.

Step 2 – Adding hosts to cluster:
1. Now that we have our cluster created, our next step is to add hosts to the cluster. As you can see below our cluster VMLAB Cluster is created and I have two hosts vmcluster1 and vmcluster2 that need to be added to the cluster. To add a host into the cluster, simply drag it to your cluster. In this case I want to add vmcluster1 to VMLAB Cluster, I’ll click on vmcluster1 and drag it to VMLAB Cluster


3. You are now ready to add the host into the cluster. Click Finish.

4. After adding both my ESXi servers in to the cluster we can clearly see the resources available increase, there are now 2 hosts, 4 CPU’s and total memory and CPU resources available, also the DRS panel has come alive, there are no recommendations yet but that is because we have hardy any VM’s powered on
Step 3 – Testing DRS:
Go to DRS tab on the cluster we created above, and click on History tab. In this example, we see below :

You can see, DPM has already power off one of the host as there is no load on this host. When required, the host will be brought online automatically.
DRS will distribute resources across hosts whenever it’s required.
1. To create a new Cluster, right click on your Datacenter object and click New Cluster.

2. On this screen we’ll give our cluster a name and turn on VMware HA and VMware DRS. For more information on HA and DRS please check out the Resources area.

3. For DRS, select Fully automated, which means i’ll leave it up to DRS to decide which host to place Virtual Machines on at start up, and to VMotion Virtual Machines to other hosts based on resource utilization. For example if a Virtual Machine is heavily using it’s CPU and Memory resources on a cluster host that already has a high CPU and Memory utilization rate, DRS will determine if there is another host available in the Cluster that has resources available. If there is, DRS will vmotion the Virtual Machine to this host. You can also set the threshold and sensitivity of DRS. The higher the aggressiveness the more sensitive DRS is to balancing the load among clusters, which means more vmotion activity.

4. We can either turn ON DRS Power Management (DPM) or leave as off. This feature allows hosts to be powered off when the host resources are under utilized (VM’s are VMotioned before the host is powered off). Once resources are needed again in the cluster, the host can be automatically powered on by DPM. The Manual setting will let you see the recommendations DPM makes without actually applying them. The Automatic setting will cause DPM to make recommendations and apply them without your acknowledgement. Once again you can adjust the sensitivity of DPM by sliding the DPM threshold slider towards Conservative or Aggressive.

5. When you setup a VMware Cluster, it is a good idea to have all the hardware exactly the same for compatibility reasons. However this is not always the case. In vSphere 4 or 5, EVC will take into account all the CPU feature sets of each Host in the cluster and determine common feature set among all hosts. It will then present this common CPU feature set to share among all hosts and virtual machines. As you can see in the window below you have the option to select AMD or Intel. As we are using the same CPU feature set among hosts, we will disable this feature in this tutorial.

6. Finally, We will be storing the Virtual Machine swapfile with the Virtual Machine. (in the same datastore as the VM). You do have the option to seperate it, however you may suffer a performance hit if you do so. Click Next.

Step 2 – Adding hosts to cluster:
1. Now that we have our cluster created, our next step is to add hosts to the cluster. As you can see below our cluster VMLAB Cluster is created and I have two hosts vmcluster1 and vmcluster2 that need to be added to the cluster. To add a host into the cluster, simply drag it to your cluster. In this case I want to add vmcluster1 to VMLAB Cluster, I’ll click on vmcluster1 and drag it to VMLAB Cluster

2. The Add Host Wizard window pops up. You are asked what you would like to do with Virtual Machines and resources that belong to the host you are adding into the cluster. First option is to “Put all of this host’s virtual machines in the cluster’s root resource pool. Resource pools currently present on the host will be deleted”. If your host does not contain any resource pools or you don’t wish to place your virtual machines in a seperate resource pool, select this option.
The second option “Create a new resource pool for this host’s virtual machines and resource pools. This preserves the hot’s current resource pool hieracrchy”. As the description explains, use this option if you wish to maintain the current resource pool struture.
The second option “Create a new resource pool for this host’s virtual machines and resource pools. This preserves the hot’s current resource pool hieracrchy”. As the description explains, use this option if you wish to maintain the current resource pool struture.

3. You are now ready to add the host into the cluster. Click Finish.

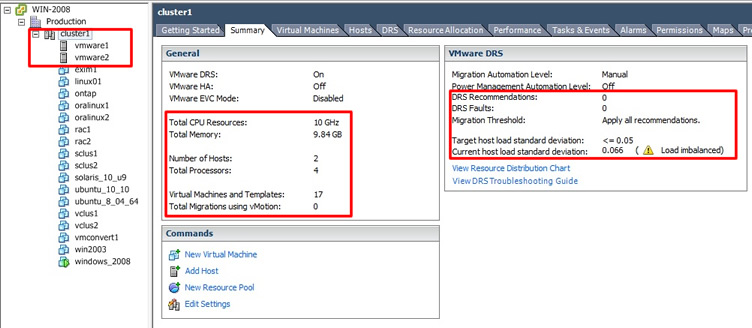
4. After adding both my ESXi servers in to the cluster we can clearly see the resources available increase, there are now 2 hosts, 4 CPU’s and total memory and CPU resources available, also the DRS panel has come alive, there are no recommendations yet but that is because we have hardy any VM’s powered on
Step 3 – Testing DRS:
Go to DRS tab on the cluster we created above, and click on History tab. In this example, we see below :

You can see, DPM has already power off one of the host as there is no load on this host. When required, the host will be brought online automatically.
DRS will distribute resources across hosts whenever it’s required.
No comments:
Post a Comment